

If you have several side hustles or your business has different URLs for different market segments, you may be struggling with logging into different Gmail accounts all the time.
It’s easy enough to get notifications on your phone, but if you’re on desktop, you may want all your email in the same inbox so you can properly organize and prioritize it.
The setup can be a little confusing, but it just takes two main steps:
- Step One: Set up POP so you can receive email to your main Gmail account
- Step Two: Set Gmail up so you can send mail as your secondary account.
For the sake of simplicity, I’ll refer to your main account and your secondary account. The main account will be where your email from all accounts will be handled. The secondary account is the account that you’re adding.
Step One: Set up POP so you can receive email to your main Gmail account
Some website recommend forwarding mail from your secondary account to your main account. This method does have faster setup. The email also appears in the main account faster when you receive it.
When testing this method, an email appeared in the secondary account a few minutes before it appeared in the main account.
However, when you reply to messages that have been forwarded, the recipient can see the the message went from the secondary account, to your main account, and back to them. For the sake of professionalism, I want it to appear that I’m using one account for the entire process. POP makes this possible.
Step 1A- Enable POP in secondary account
Log into your secondary account and access the Settings gear in the upper right corner. Then select See All Settings.
Navigate to the Forwarding and POP/IMAP tab.
Under the POP Download section, click the button beside Enable POP for mail that arrives from now on.

Under When messages are accessed with POP: leave it so that your secondary mail is kept in the inbox.
Hit Save Changes at the bottom.
Step 1B- Receive mail in main account
Log into your main account and access the Settings gear in the upper right corner. Then select See All Settings.
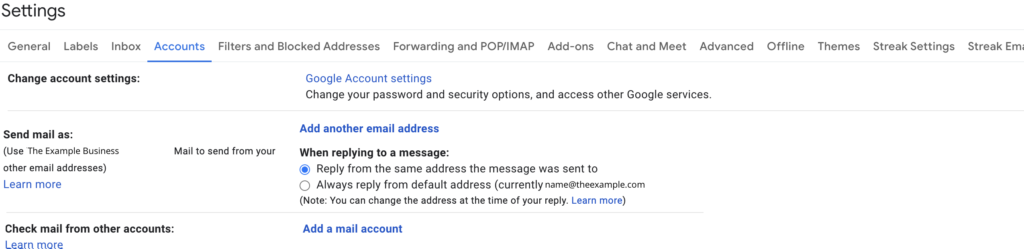
Navigate to the Accounts tab.
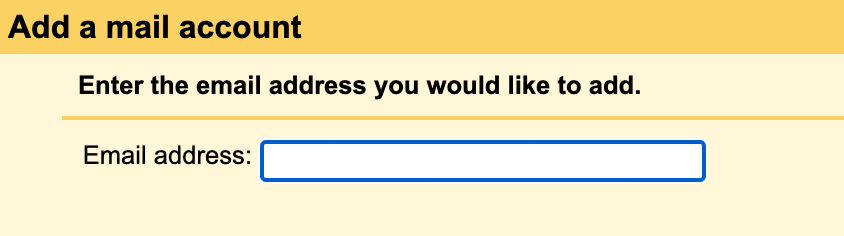
Beside Check Mail from Other Accounts, select Add a Mail Account.

On the next screen, type the email address of your secondary email account, and select Next.
To avoid en error message like “We were unable to locate the other domain. Please contact your other provider” when setting up POP in your Gmail, be sure to follow these next steps very carefully.

- Your username should be pre-populated, but you’ll need to type the part of the your secondary email address after the “@” sign. This field should contain the ENTIRE secondary email address you want to access.
- Enter the password of your secondary email address.
- The POP Server field should be pre-populated as “mail.[second-part-of-secondary-email-address]. You’ll need to replace this with exactly: “pop.gmail.com”- without the quotes.
- Choose the Port- 995
- Do not select “Leave a copy of retrieved message on the server.” You’ll get en error message if you do. You’ll still have a copy in the secondary account because you chose “Leave a copy of [business name] mail in the inbox in the first step.
- I also select “Always use a secure connection (SSL) when retrieving mail.”
- I select “Label Incoming Messages”, then click the box, scroll to the bottom, and select New Label.
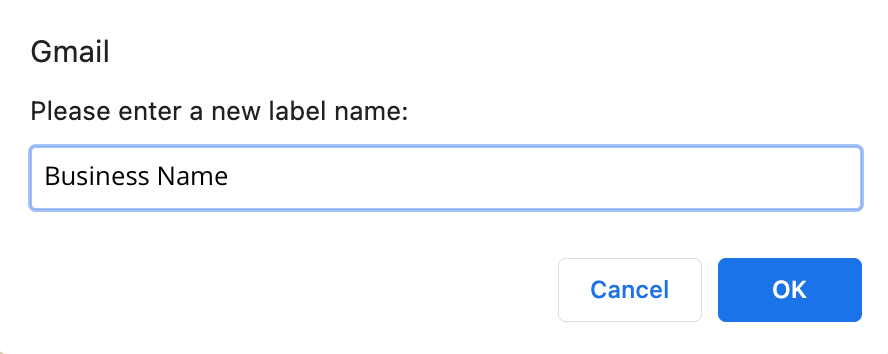
8. From there, a dialog box pops up and I type in the name of the secondary business. Once I hit Okay, the secondary business name is selected in the Label box.
9. I choose “Archive incoming messages (Skip the Inbox)” because I’m going to set up Multiple Inboxes so all my secondary email messages will be in one place in my inbox. If you aren’t going to do this, you probably don’t want your messages archived. They won’t show up in your inbox.
10. Select Add Account. The window should disappear, and you’ll see the secondary address listed in your Check Mail From Other Accounts section.
Dealing with errors during Gmail POP setup
If you get an error message that says you need to enable less secure apps, go to https://myaccount.google.com/lesssecureapps and make sure you’re logged in as your secondary email. If not, just select it in the right corner where your profile photo is. Once you arrive, flip the switch to “On”, you’ll be able to proceed.
If your account uses two step verification (which it absolutely should- usually), you won’t be able to enable less secure apps without a workaround. You can leave two-step verification on your primary account, and leave it off on your secondary account. Don’t ever send passwords or personal information over email to reduce your risk.
Test POP email setup
Use a personal email address and send an email to your secondary email account. I like to put “Test1” in the subject line and message. If it doesn’t go through and I have to send another test email, I’ll know which one I received.
Now, go check your primary email to see if the test email came through. If you selected “Archive incoming messages (Skip the Inbox)”, be sure to check the folder you sent the messages to.
Once you see the message arrive, you can move to the next step. Don’t delete it- we’ll be doing one more test with it later.
Step Two: Set Gmail up so you can send mail as your secondary account.
Again, this just enhances your professional appearance when sending emails. It could look a little fishy if a potential client emails one email address and gets a reply from a different one.
Log into your main account and access the Settings gear in the upper right corner. Then select See All Settings.
Under the Accounts tab, you’ll see a section titled Send mail as. Click the blue text beside it that says Add another email address.
A new window will open entitled Add another email address you own.
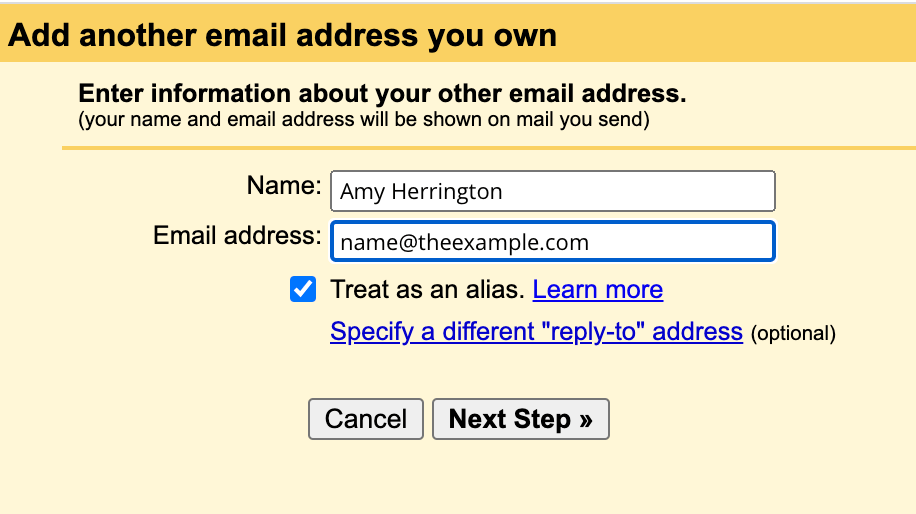
Enter the name you want used on outgoing mail and the email address of your secondary account.
I keep “Treat as an alias” selected.
Click Next Step. If you get an error, keep reading. If not, skip this next section.
Dealing with Errors:
You may run into an error that says: You must send through theexample.com SMTP servers when you send as name@theexample.com. However, this functionality is not available for your account. Please contact your domain administrator for more information.
If this is the case, log into admin.google.com and make sure you’re using your secondary email account. Search for and select “End User Access” in the top search bar.
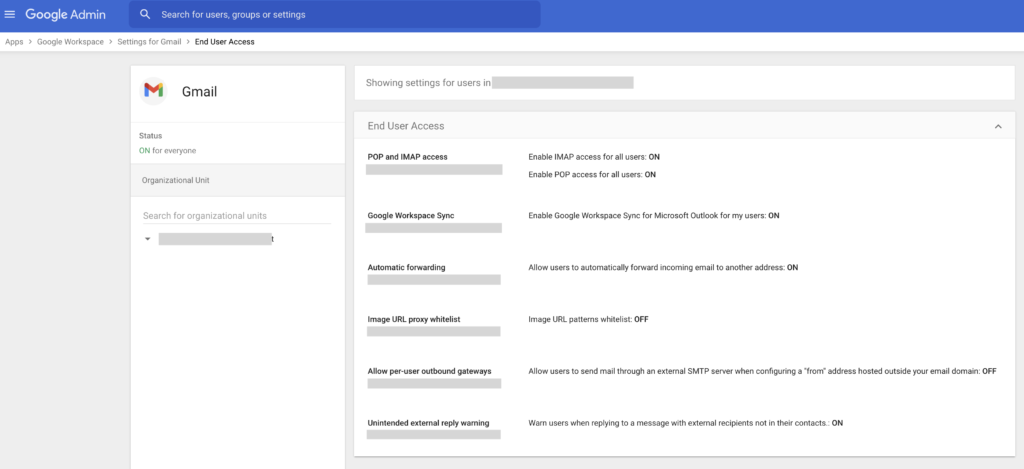
When the End User Access window opens, select Allow per-user outbound gateways.

Then click the box that says Allow users to send mail through an external SMTP server… and click Save at the bottom.
Wait a few minutes, then try again. It took mine about 10 minutes before I could move on.
Setting up your SMTP Server
The next step will appear entitled Send mail through your SMTP server. This is another tricky step, so follow along closely.
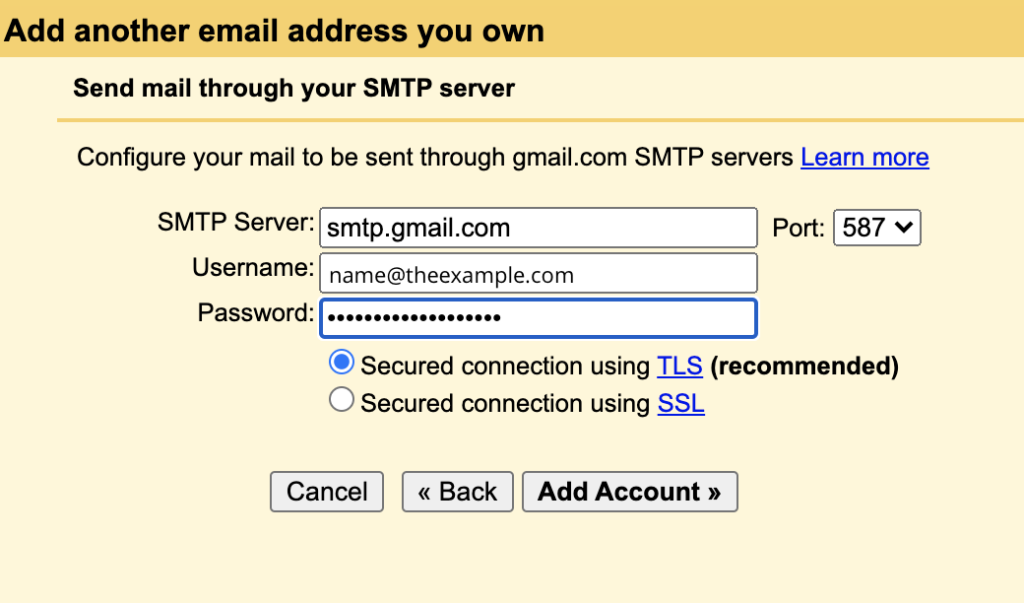
SMTP Server- this may be auto populated to include your mail URL and we need to change it. Replace it with “smtp.gmail.com” without the quotes.
Username- enter the entire email address for your secondary gmail account
Password- enter the password of your secondary gmail account.
Select Secured connection using TLS.
Set the Port to 587.
Click Add Account.
You’ll end up on a screen asking for a verification code.
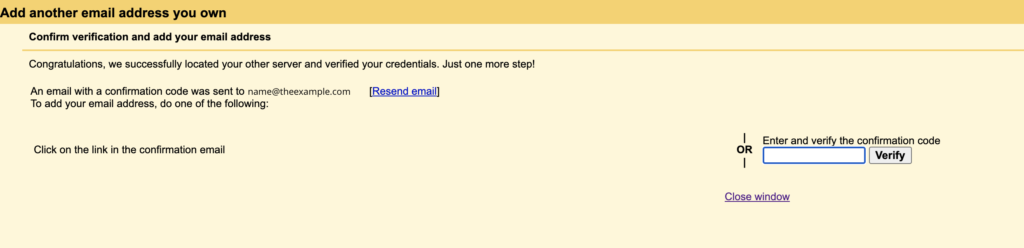
Check your secondary email account (or your primary account since you’ll see secondary emails there too now). Grab the verification code and paste it into this box.
Once you’ve hit verify, the window closes. You’ll be able to see your secondary email address in the list of “Send Mail As” addresses in your primary Gmail settings.
Test “Send Mail As” Setup
Go back to your primary inbox and find the test email you sent earlier.
Open it and hit Reply.
The compose box will open. Click on the “To” field, and the “From” field will appear beneath it. You’ll see that the From field has your secondary email in it. Type a quick test message, like “Test Reply1” and make sure it gets delivered back to your personal email address.
Congrats…you now have a more streamlined work email system in place!